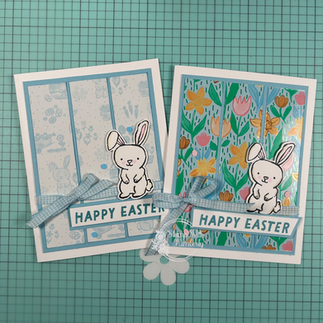
top of page
Stampin' Up! Demonstrator

Kimberly Gora

  • kimberlygorasu

This thank you card came together beautifully using Stampin' Up! Square Snippets Designer paper as the inspiration. I pulled coordinating tones from the paper to create a soft Petal Pink background that feels both elegant and inviting. The leafy elements were gently ink blended to add depth and movement, giving the card a natural organic feel.


Behind the sentiment, a wood grain element adds the perfect touch of texture and warmth, helping the simple "thank you" stamd out without overpoweringthe design. To finish if off, a pretty pink bow adds a sweet, feminine accent that ties everything together.


1. Petal Pink- 8-1/2" x 5-1/2". Score at 4-1/4"


2. Cut coordinating pieces of DSP from Square Snippets, and cut various sizes. I used 3/4", 1-1/2", and 2". Glue to card, and trim off excess.


3. Die cut white tag. Stamp leaves in Petal Pink. Glue to card front.


4. Die cut leaves, and use a blending brush to add Pink ink to edges. Glue to card front.


5. Die cut Cajun Craze leaves, and Pecan Pie wood . Add to card.


6. Stamp sentiment in Cajun Craze, on a white circle die-cut. Add to card with dimentionals.


Add gems of choice.


A sweet little self-care gift in soft pink!

There's something so comforting about handmade gifts, especially when they're created with a calming color palette and thoughtful details.

Today I'm sharing a little bag I made that's perfectly sized to hold a Dove hand cream. It's a simple but meaningful way to share a bit of self-care with someone special. It is a gentle reminder to slow down and take care of yourself. Something we could all use more of.


1. Peatl Pink- 10-1/4" x 5"


Score landscape at 3-1/2", 4-3/4", 8-1/4", 9-1/2"


Turn and score portrait at 1-1/4" on 1 side.


2. Cut up small score lines, and notch. Take off small end piece completely.


3. Use tear tape to assemble.


DSP- 2 pieces of 3-1/4"x 3-1/2"


2 pieces of 1" x 3-1/2" (sides)


Die cut a white circle. Add ephemera pieces.


Stamp sentiment on ephemera circle. Punch a hole, and thread with twine.


Add bow with ribbon.


I made this fun Birthday card using the Hobby Haven Designer paper.

This card has a little bit different cut, for interest.

I like the woodgrain as a landing spot for the cute plant ephemera, and banners.

To watch the tutorial for this card, as well as two other projects that we made today, on Motivation Monday, check out the video below.


1. White cardstock- 7" x 5-1/2"


Score at 2-3/4"


2. DSP- 2-3/4" x 5-1/2"


1-1/2" x 5-1/2"


3. Die-cut a large circle. Glue to left side


4. Die-cut a small circle, and stamp sentiment in Early Espresso.Add to card with dimentionals.


5. Punch out 2 banners. 1 in Pecan Pie, and 1 in Coastal Cabana. Layer, and add to card front.


6. Add ephemera from DSP pack. Add gems.


7. Add ephemera banner to inside of card, and stamp sentiment.


  • Facebook
  • Pinterest
  • Instagram

© 2020 by Stampin with Kimberly   |   Proudly created with Wix.com

bottom of page